Wednesday, December 28, 2016
Tuesday, December 13, 2016
Deep Dive into Dependency Injection and Writing Decoupled Quality Code and Testable Software
Dependency Injection is one of those terms that advanced programmers throw out with an expectation and assumption of full understanding on the part of the receiver. It's easy to get infatuated by a cool buzz phrase, especially when you hear so many others using it, but to truly understand something you need to start by understanding the problem spaces that it is trying to solve. It's important to learn the concepts behind DI so you can write software that can be properly tested. In this session, we explain dependency injection from concept to implementation, and use raw code samples to show you how it works and what problems it solves. We demonstrate how writing abstracted code can help you test your applications much better, whether or not you use a DI container. Then we get into what a DI container is and differences between Unity, MEF, MEF2, CasttleWindsor, Ninject, etc. and the different techniques, like DI thru Constructor, Properties, Interception, object graph LifeTime, and other topics. We finish by showing you implementation examples in three different platforms.
Tuesday, December 6, 2016
Git. Cases, solutions, flows.
1. Задачу Accept. Переводим в статус In Progress.
2. Create branch
3. Вваливаем себе локальную версию ветки в папке с проектом:
git fetch
git checkout "new_brunch_name_on_server"
(если не нужны локальные изменения то можно git checkout "new_brunch_name_on_server" -f)
4. Когда готово:
git status
git add .
git commit -m "BOOKS-444 commentsdfsd"
git push
5. Открываем ветку из таски, create pull request
6. Переводим
7. PS: Если хотим залить мастер в локальную ветку
git merge master
или если с форсом из мастера, перетирая локальные изменения
git merge -X theirs origin master
8. Если мы хотим удалить запушенный коммит:
git rebase -i HEAD~<количество последних коммитов, которые хотим увидеть>
Прим.: git rebase -i HEAD~3
затем то напротив ветки, которую нужно удалить, что открылось в редакторе нуждо вначале поставить d (means drop)
сохранить
затем git pull
-------------
Переключиться на определенную ветку. Запушать мастер в эту ветку. Сделать изменения, порешать конфликты. Запулить обратно с форсом.
git reset --hard dfgsdfgdfgsdf
git merge origin master
git add --all
git push --force
-------------
сброс всех текущих изменений, до последнего коммита
git reset --hard
git clean --force
--
Принудительно запушать ветку в удаленную:
git push remote_full_brunch_name local_brunch_name:remote_brunch_name
git push --set-upstream localmaster master
https://git-scm.com/book/ru/v1/%D0%92%D0%B5%D1%82%D0%B2%D0%BB%D0%B5%D0%BD%D0%B8%D0%B5-%D0%B2-Git-%D0%9E%D1%81%D0%BD%D0%BE%D0%B2%D1%8B-%D0%B2%D0%B5%D1%82%D0%B2%D0%BB%D0%B5%D0%BD%D0%B8%D1%8F-%D0%B8-%D1%81%D0%BB%D0%B8%D1%8F%D0%BD%D0%B8%D1%8F
Monday, December 5, 2016
MSSQL Mirroring. Useful notes.
The mirror server instance is not caught up to the recent changes to database:
Database mirroring
If you connect with ADO.NET or the SQL Native Client to a database that is being mirrored, your application can take advantage of the drivers ability to automatically redirect connections when a database mirroring failover occurs. You must specify the initial principal server and database in the connection string and the failover partner server.
Data Source=myServerAddress;Failover Partner=myMirrorServerAddress;
Initial Catalog=myDataBase;Integrated Security=True;
There is ofcourse many other ways to write the connection string using database mirroring, this is just one example pointing out the failover functionality. You can combine this with the other connection strings options available.
Models:
https://msdn.microsoft.com/en-us/library/ms189852(v=sql.100).aspx
How to: Minimize Downtime for Mirrored Databases When Upgrading Server Instances
https://msdn.microsoft.com/en-us/library/bb677181(v=sql.100).aspxHow to: Manually Fail Over a Database Mirroring Session (SQL Server Management Studio)
GIT. Change editor to Notepad++
git config --global core.editor "'C:/Program Files (x86)/Notepad++/notepad++.exe' -multiInst -notabbar -nosession -no Plugin"
Monday, November 21, 2016
LINQ. Except. Filtering records from set
Let's imagine, you have:
class AppMeta
{
  public int Id {get;set;}
}

var excludedAppIds = new List<int> {2, 3, 5, 6};
var unfilteredApps = new List<AppMeta>
                         {
                           new AppMeta {Id = 1}
                           new AppMeta {Id = 2}
                           new AppMeta {Id = 3}
                           new AppMeta {Id = 4}
                           new AppMeta {Id = 5}
                         }
Solution:
Add an extension to Except:
public static class ExtensionMethods
{
    public static IEnumerable<TA> Except<TA, TB, TK>(
        this IEnumerable<TA> a,
        IEnumerable<TB> b,
        Func<TA, TK> selectKeyA,
        Func<TB, TK> selectKeyB,
        IEqualityComparer<TK> comparer = null)
    {
        return a.Where(aItem => !b.Select(bItem => selectKeyB(bItem)).Contains(selectKeyA(aItem), comparer));
    }
then use it something like this:
var filteredApps = unfilteredApps.Except(excludedAppIds, a => a.Id, b => b);Monday, November 7, 2016
Remote IIS Debugging : Debug your ASP.NET Application which is hosted on "Remote IIS Server"
Background :
In the last month I have published an article on Debugging of ASP.NET Application that hosted on IIS server using process attaché. And I have got a very good response from all the readers, specially Yankee Imperialist Dog! , Pete O'Hanlon, Dr.Luiji , Manas Bhardwaj and many others . And they have suggested me for a follow up article on IIS Remote debugging. Thanks to all of them for their feedback and giving me another opportunity to write an article. I think this will help you all. Please give your valuable suggestions and feedback to improve on my article.
Introduction :
Before starting with this article, I will request you to read my previous article Debug Your ASP.NET Application that Hosted on IIS : Process Attach and Identify which process to attach . This article will give you the basic understanding of Debugging ASP.NET Application that is hosted on Local Server, along with Process selection among multiple processes. And article was all about if you have IIS installed in local server, that means you have hosted your site on your local development environment or your Web server/ production server having visual studio installed. But this is not the real scenario.
Now coming back to this article, this article is all about the IIS remote debugging. You are developing your application in you local system which is hosted on remote web server and now you need to debug it. How will you do that ? This article will describe all the necessary steps like how to configure remote debugging, attaching process from remote server, start debugging etc. This is one of the most challenging task in ASP.NET. Hope I have explained it clearly.
Visual Studio Debugging Features for ASP.NET
We can have three different way to debug our application from Visual Studio. They are:
Visual Studio Internal DebuggerLocal IIS DebuggingRemote IIS Debugging
Visual Studio Internal Debugger :
We are all aware of that visual studio is having its own internal
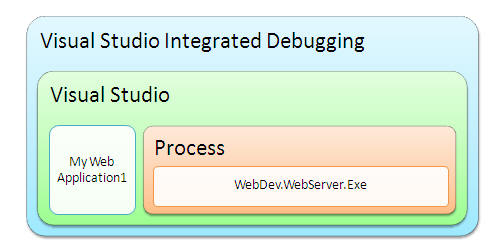
ASP.NET debug engine which is used to debug our ASP.NET web application while we are developing it. The process which is used to debug the application within visual studio is WebDev.WebServer.Exe . ASP.NET Engine uses WebDev.WebServer.exe to debug the application. Now if you want to know more details about it please read this . 
Fig: Block Diagram for Visual Studio Internal Debugger
Local IIS Debugging :
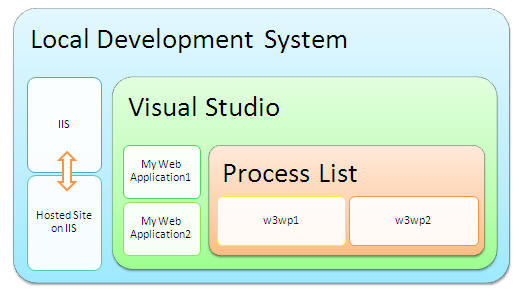
This is all about my last article . Just brush up the things, I am explaining the whole scenario using following diagram. [ Though it was not necessary, because I have already explained it in my last article, still I have used only for the co-relation with the remote debugging. ]

Fig: Block Diagram for Debugging ASP.NET site from Local IIS Server
In local IIS debugging, IIS should be installed in the local system where we have visual studio installed. For debugging the application hosted on IIS from visual studio, we need to attach the worker process (
w3wp.exe) with in visual studio. After that we will able to start the debugging of the web application.Remote IIS Debugging :
This is the main topic which we should cover in this article. It is one of the best features and it is very much helpful when we do not have a IIS Server installed in local system or when we have to store the applications at a centralized location. The scenario comes when you are having with your application code in your system and the build which was deployed on different IIS server. Below diagrams shows the overall diagram for remote debugging.

Fig: Block Diagram for Remote debugging of ASP.NET Application
Remote debugging with Visual studio and Remote IIS is very easy to setup. The tool which is used to setup and configure the process is know as
"msvsmon.exe". I have describe each and every steps to start, configure the msvsmon tool and debug the application. But before that just have a look on why should we need remote debugging.Why Remote Debugging :
Before going into details, we need to know when we have to use remote debugging,
- Local development server does not have IIS installed.
- Development server and Build/Released/Hosting Server is different
- Application located in centralized location.
Remote Debugging Tool
The tool which is used to remote debugging of the ASP.Net application know as "
Msvsmon.exe" . The Remote Debugging tool (Msvsmon.exe) is a small windows based application that Visual Studio 2005 uses for remote debugging. It has very simple UI which makes it very simple to setup and configure During remote debugging, Visual Studio 2005 runs on one computer and the Remote Debugging Tool runs on the remote computer along with the application you are debugging.
Fig: Block Diagram for Remote debugging of ASP.NET Application with msvsmon
If we want to debug the application which is hosted on remote IIS, we have to start the msvsmon.exe to the remote server, and our development system is the debugger host where we will debug our code.
Start msvsmon.exe
Msvsmon.exe is installed to the following paths:Install path\Microsoft Visual Studio 8\Common7\IDE\Remote Debugger\x86
First of all we need to Run the Application from the location and we will get following screen,

Fig: Initial startup of msvsmon.exe
At the time of starting of application the window will show the status message
"Msvsmon started a new server named '<ServerName>'. Waiting for new connection". Which means Debugging monitor tool is ready to connect with some remote server. Now I can connect with this remote server and get the list of all process that is running on the server.Configure Authentication Mode
Configuration of msvsmon tool is very easy. The main configuration is involves with the authentication mode. Msvsmon support two types of authentication
Windows AuthenticationNo-Authentication
Windows Authentication
Msvsmon provide highlevel security with the windows authentication mode. The user who want to debug the application remotely he should be authenticated, means he should have sufficient permission to access the debugging facility from the remote system. For Setup the Windows authentication mode, We have go
"Tool" > "Options" . Following window will appear,Fig: Setup and configure security settings
Now we have a permission button along with the windows authentication radio button. Using that, we can give permission to any user who belongs to that windows group. If we click on the Permission button, following screen will appear
Fig: Add user for windows authentication
By default, Administrator should have the permission for remote debugging, we can use add button to add new user and can give the Debug access or Deny the Debug persmission to any user. For example, I have added myself by just clicking on Add button and take the access control.
Fig: Add user for windows authentication
Now, I have give me the permission for debugging from remotely (from Debugger Host).
Fig: Debug permission for selected user
Similiarly we can select any user from Active Directory and can deny the request for remote debugging though the user is Windows authenticated user.
I have discussed about how to debug remotely with windows authentication mode in the process attache section.
No-Authentication
There is no security involved with this authentication mode. Any one can debug remotely, if the authentication mode is set to
"No-Authentication". As this debugging mode is not at all secure, so it should be used only on secure network.
Fig: No-Authentication Mode Configuration
No Authentication mode only supports native debugging. You can also guess the behaviour from the warning message. We have a "
Allow any User to Debug" check box. If we checked that one, any user can able to debug.
In the next section I have described, how to attach the process for remote debugging for both Windows and No Authentication Mode.
Attach Process from Remote System
Now, Remote Debugger is ready to accept a new connection to start remote debugging. And we have already gone through how to configure the msvsmon for both windows and No-Authentication mode. Now we will check how to connect with them and start debugging,
Before what we need to do, we have created a Web application and hosted it IIS where msvsmon is running, We need to connect it from our local system where we are having our code. Now lets have a look in the case of windows authentication mode
Process Attach - Windows Authentication Mode
Process Attach - Windows Authentication Mode
First of all we need to open the application from visual studio in our development system. Now we need to attach the process from remote server. Goto
Tool > Attach Process 
Fig: Attach Process From Visual Studio
When we will click on the "
Attach to Process" we will get the following screen .
Fig: Default Process List
Right now it is showing all the process that are currently running on the system. Now we need to connect it the remote system. Now I have already started a msvsmon with name
"abhijit.jana" and it is waiting for a new connection.
Fig: msvsmon is running on remote host
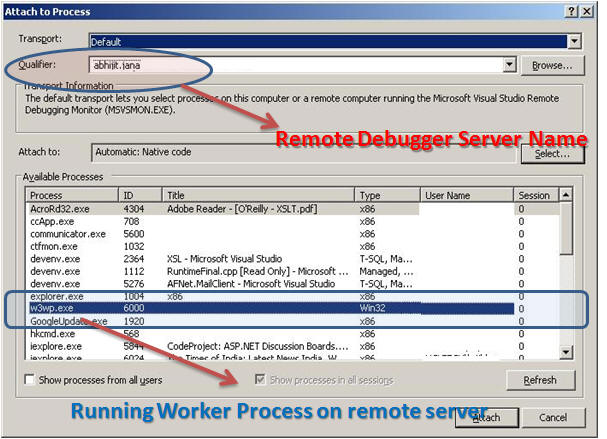
Now, I am going to connect with the remote system from my local visual studio IDE. So, what we need to do. We have to give the remote server name to the Qualifier section in attach process window.

Fig: Connect with Remote host and get the list of process
Now, in the process list all the process are listed from remote server along with Worker Process (
(w3wp.exe). Now this is the exact worker process which we need to attach with our code. One more thing, when we are getting the list of process from it means remote server is connected. Now if we check the msvsmon window, it will show another message that user is connected. Have a look into the screenshot
Fig: Debug monitor showing message of connection
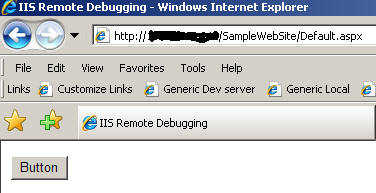
Now, our application is ready to debug. just set a break point in your code and enjoy the debugging. Here is our web site [
Hosted on Remote IIS Server ] and which having a server side button, and I want to debug the application on the click of button.
Fig: Access site from Host URL
Now process is attached in our visual studio and I have set the breakpoint on the button click method. Here is outcome.

Fig: Debugger at breakpoint
So, let enjoy the debugging from remote server . Now lets have a look how will we remote debug in
No-Authentication mode.Process Attach - No Authentication Mode
This is quite similar to windows authentication process attach. I have already discussed that, how to configure the No-Authentication mode in remote debugger. We have to attach the process similar way that I have discussed. There are some few changes. Transport mode should be selected to -
Remote (Native only with no authentication) [ Check the Screen shots] .And we need to provide the qualifier "abhijit.jana: 4015". Have a look into screen shots,
Fig: Process Attach for No-Authentication Mode
So, now we need to attach the worker process and need to start debugging, on which I have already discussed. There is slight change in connect while remote debugging going on with No-Authentication mode. Debugging monitor will display a message on the window that debugging is running on no authentication mode.

Fig: Status message for No-Authentication Mode
So, this is all about how to debug you application from remote IIS server in both windows and No-Authentication mode.
Debugging For Multiple User
This is one of the most fantastic features of Msvsmon tool. Msvsmon debugging monitor tool allow multiple user to debug simultaneously. . Each instance of the remote debugger has a
unique server name. As I have already shown that Server names are configurable, so we can give an instance of the remote debugger any server name. Now multiple user can able to access the same
Fig: General block diagram from Multiple Debugger instance
Some Important Tips while remote debugging
- Visual Studio 2005 remote debugging components must be installed on the remote computer
- we must reference the remote computer by using a computer name instead of an IP address.
- The Web.config file for the ASP.NET application must not contain any errors, and the compilation element must have the debug attribute set to True.
- Make sure that a firewall is not blocking remote debugging.
- The security setting for the site must allow Integrated Windows authentication.
- Make sure that the Remote Debugging Monitor is running on the remote server. If Msvsmon.exe is not running, you receive the following error message.
Summary :
Now to finalize the things, just take a quick summary. msvsmon is an utility which provides the facility to debug the application which is hosted on remote IIS server. It provides two kind of authentication mode, Windows and No-Authentication Mode. In Case of windows authentication mode the user should need the permission to access the instance of remote debugger but on the other hand No-Authentication does not required and security permission.
Fig: Overall Summary
Reference :
Friday, October 21, 2016
HTTP Basic Authentication/Authorization
Basic Authorization is simpliest and easier way to make your service secure if it is using HTTPS (HTTP over SSL)
Usage example:
An Encoding Parameter for HTTP Basic Authentication Description:
http://greenbytes.de/tech/webdav/draft-reschke-basicauth-enc-latest.html
Usage example:
var client = new WebClient {Credentials = new NetworkCredential("user_name", "password")};
var response = client.DownloadString("https://someserver.com/blabla/blabla");string username = "Your username";
string password = "Your password";
string svcCredentials = Convert.ToBase64String(ASCIIEncoding.ASCII.GetBytes(username + ":" + password));
request.Headers.Add("Authorization", "Basic " + svcCredentials);An Encoding Parameter for HTTP Basic Authentication Description:
http://greenbytes.de/tech/webdav/draft-reschke-basicauth-enc-latest.html
Tuesday, October 11, 2016
Escaping special symbols in xml like '
http://weblogs.sqlteam.com/MLADENP/archive/2008/10/21/Different-ways-how-to-escape-an-XML-string-in-C.aspx
http://foxtools.ru/HtmlEncoder
using System.Web;
using System.Xml.Linq;
using System.Net;
namespace console
{
class Program
{
static void Main(string[] args)
{
//
string special_xml = "Алиса в Стране чудес / Alice's Adventures in Wonderland";
// Алиса в Стране чудес / Alice&apos;s Adventures in Wonderland
string encodedXml_escape = System.Security.SecurityElement.Escape(special_xml);
// Optimal one
// Алиса в Стране чудес / Alice's Adventures in Wonderland
string encodedXml_http = HttpUtility.HtmlDecode(special_xml);
string encodedXml_web = WebUtility.HtmlDecode(special_xml);
//Необработанное исключение типа "System.Xml.XmlException" в System.Xml.dll
string encodedXml = XDocument.Parse(special_xml).ToString();
}
}
}
Different ways how to escape an XML string in C#
XML encoding is necessary if you have to save XML text in an XML document. If you don't escape special chars the XML to insert will become a part of the original XML DOM and not a value of a node.
Escaping the XML means basically replacing 5 chars with new values.
These replacements are:
| < | -> | < |
| > | -> | > |
| " | -> | " |
| ' | -> | ' |
| & | -> | & |
Here are 4 ways you can encode XML in C#:
1. string.Replace() 5 times
This is ugly but it works. Note that Replace("&", "&") has to be the first replace so we don't replace other already escaped &.
string xml = "<node>it's my \"node\" & i like it<node>"; encodedXml = xml.Replace("&", "&").Replace("<", "<").Replace(">", ">").Replace("\"", """).Replace("'", "'"); // RESULT: <node>it's my "node" & i like it<node>
2. System.Web.HttpUtility.HtmlEncode()
Used for encoding HTML, but HTML is a form of XML so we can use that too. Mostly used in ASP.NET apps. Note that HtmlEncode does NOT encode apostrophes ( ' ).
string xml = "<node>it's my \"node\" & i like it<node>"; string encodedXml = HttpUtility.HtmlEncode(xml); // RESULT: <node>it's my "node" & i like it<node>
3. System.Security.SecurityElement.Escape()
In Windows Forms or Console apps I use this method. If nothing else it saves me including the System.Web reference in my projects and it encodes all 5 chars.
string xml = "<node>it's my \"node\" & i like it<node>"; string encodedXml = System.Security.SecurityElement.Escape(xml); // RESULT: <node>it's my "node" & i like it<node>
4. System.Xml.XmlTextWriter
Using XmlTextWriter you don't have to worry about escaping anything since it escapes the chars where needed. For example in the attributes it doesn't escape apostrophes, while in node values it doesn't escape apostrophes and qoutes.
string xml = "<node>it's my \"node\" & i like it<node>"; using (XmlTextWriter xtw = new XmlTextWriter(@"c:\xmlTest.xml", Encoding.Unicode)) { xtw.WriteStartElement("xmlEncodeTest"); xtw.WriteAttributeString("testAttribute", xml); xtw.WriteString(xml); xtw.WriteEndElement(); } // RESULT: /* <xmlEncodeTest testAttribute="<node>it's my "node" & i like it<node>"> <node>it's my "node" & i like it<node> </xmlEncodeTest> */
Each of the four ways is different, so use each one where you fell appropriate. You can't go wrong with SecurityElement though. :)
Online HTML Encoder/Decoder:
Some HTML decode test:
using System.Xml.Linq;
using System.Net;
namespace console
{
class Program
{
static void Main(string[] args)
{
//
string special_xml = "Алиса в Стране чудес / Alice's Adventures in Wonderland";
// Алиса в Стране чудес / Alice&apos;s Adventures in Wonderland
string encodedXml_escape = System.Security.SecurityElement.Escape(special_xml);
// Optimal one
// Алиса в Стране чудес / Alice's Adventures in Wonderland
string encodedXml_http = HttpUtility.HtmlDecode(special_xml);
string encodedXml_web = WebUtility.HtmlDecode(special_xml);
//Необработанное исключение типа "System.Xml.XmlException" в System.Xml.dll
string encodedXml = XDocument.Parse(special_xml).ToString();
}
}
}
Subscribe to:
Comments (Atom)